It’s that time of year again when Husband and I make elaborate costumes for our family!
Both of our kids are avid readers, and last summer, they read a significant number of books from the Sonlight Summer Reading list. The Snared series by Adam Jay Epstein was a particular hit with both of them (affiliate link to book 1:https://amzn.to/3SPJ9hQ). As we were brainstorming costumes this fall, they proposed two of the characters for themselves (…I hoped that Husband and I could get involved as Pryvyd and The Scarf, respectively, but alas, we ran out of time…)
So without further ado, may I present Moshul the moss golem (with his hugtopus!) and Odette the elf!
I will have individual posts for each of the costumes coming soon! (stay tuned for links below)
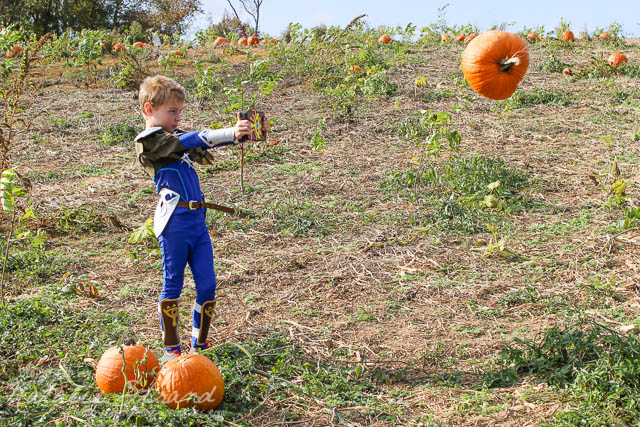
Our son dressed as Link from The Legend of Zelda: Breath of the Wild. At the time we were deciding on our costumes, his game character was wearing Zora armor, so he specifically requested to wear that gear as his costume. We brought up his character in-game and took photos for reference!
I made the blue shirt and stealth leggings by hacking Simplicity 1030. It’s a Captain America costume pattern in which the lower half of the shirt is pieced stripes. (Side note: I am really impressed with the design of this pattern. Often costume patterns are badly drafted and ill-fitting, but this is not the case for Simplicity 1030! The style lines and construction are well-done!). The upper part of the shirt has some nice style lines that were perfect for Link’s blue shirt, so I combined the side panel pieces to extend as one piece from the underarm to the hem and lengthened the upper torso pattern pieces to the hem. The result was a very sharp-looking athletic shirt, and I’m contemplating making it again with another fabric!
I added the side accents by layering some scraps I cut into the proper shapes and attaching them to the shirt with basting stitches. The blue fabric I used for the shirt and pants was an interesting athletic knit I found in the clearance section of G Street Fabrics, but it was difficult to stitch, so I thought it would be better for those side panels to be temporary. We will likely repurpose the shirt and leggings as winter pajamas!
I found a free jacket pattern (in my son’s size!) that was the perfect starting point for the scale jacket, and I hacked it beyond recognition, haha! I used a sueded fabric that was handed down to me in a bin of fabrics–it was the perfect color. After I cut the outer layer pieces, I hand-cut all the scales and sewed them in rows before stitching the pieces together.
My final contribution to the Link outfit was the beaded bandolier. I used Sculpey (polymer clay) to mold the moon medallion and the long beads (in retrospect, perhaps dry ziti would have been a lighter weight and easier solution for the long beads!). I strung them with some plastic faceted beads, and my husband spray painted them all with chrome paint. I used a scrap of vinyl to create the “leather” strap that goes over his shoulder, and the beaded strand is attached to key rings I stitched to the ends!
Now, on to the showstopper parts of the costume: the armor!
Husband sketched out the armor pieces on paper after studying the reference photos we took of all angles of Link, cutting out the paper templates to test sizing on our son. When he was satisfied with the design, he traced the pieces on to layers of craft foam and cut them out by hand. After constructing the pauldrons, bracers, and faulds (hip guards), he spray painted them with chrome paint. If we make foam armor in the future, Husband notes that he will apply some sort of sealant to the foam before spray painting to prevent the metallic paint from soaking into the foam and give a shinier end result.
The pauldrons are pinned to the shoulders of the scale jacket.
The faulds are threaded onto the belt with elastic loops that are adhered on the back.
The bracers have elastic straps for our son to wear them on his forearms.
The greaves (shin guards) are also constructed from craft foam, which Husband hand-painted with brown and metallic gold craft paint.
We had a lot of fun taking action photos of our soon acting as Link during our photoshoot at the pumpkin patch…
(No healthy pumpkins were harmed in the making of this trick shot!)
This last photo is a little teaser: Husband created Sheikah slates for our Zelda and Link! Stay tuned for a guest post from him about how he made them!
Summary of patterns: shirt: Simplicity 1030 (hacked) scale jacket: Shwin and Shwin Mr. Postman (hacked) pants: Simplicity 1030 (lengthened) belt, shoes: ready-to-wear
So it was not a surprise that he asked for a Minecraft-themed cake for his birthday. Note: his birthday was during the summer; I’m just now getting my act together to post about this cake. It came out so well that I definitely still want to share it!
When we asked him what sort of Minecraft cake, I was expecting him to ask for a scene or a creeper (or both). Instead, he asked for a grass block! He wanted the brown parts to be chocolate and the green to be mint. Challenge accepted.
I baked the cakes and mixed up frosting– I baked two square chocolate cakes, which we trimmed down so that we could make four layers. The top and bottom layers are solid squares; the middle two layers are made from the offcuts stacked perpendicular to each other. We used chocolate frosting between the layers.
Husband did all of the outside work! Of course, we waited until late at night to begin the frosting process, and I was so wiped out that all I could do was offer some suggestions. Husband did an absolutely amazing job. He figured out that he could cut a cardstock template for the grass detail on the sides of the block.
Husband took it one step further and did some sugar work to create the new growth that would occur if the block is sprinkled with bonemeal in the game. I really think this is such a showstopper!
It was so fun to see how completely delighted our son was about his cake! (and it tasted pretty delicious, too!)
In 2019, I was in a big giant Boot, but Husband, V, and B participated in our elementary school PTA’s Fun Run and 5K fundraiser. It was a fun time, and I was really proud of my daughter and son for completing the mile-long Fun Run together. Even more impressive was that my husband had carried my son part of the way while running (jogging?) with the kids on the Fun Run course, and then went on to finish the 5K in a respectable time.
My favorite part, though, was seeing my children finish their race and cross the finish line holding hands. This called for a special layout:
I used a horizontal design so that I could show off two 4×6 photos and two 3×4 photos (small only because the quality was poor– they were screenshots from a video clip… These photos make my heart explode and they are giant in my mind!). I pieced together two patterned papers behind the photos to form the background.
Almost all of the embellishments are cut from patterned paper! The “Amazing” plane+banner and the “Remember This” strip are from cut-apart sheets… and I sneakily chopped out bits of the floral paper behind the photos so that I could detail cut some of the flowers to use as embellishments. I also detail-cut the cameras from yet another patterned paper!
I used two journaling cards to tell the two pieces of the story: my husband’s intrepid running and my kids’ display of their strong relationship.
The title has a double meaning… not only were they all running on the road, but the mascot for the elementary school is Rudy the Roadrunner!
Supplies: patterned paper: Shimelle “Go Now Go” (Botanical, Action), Close to My Heart “Mix In” (Mar-Apr), Shimelle “Starshine” (Odyssey, Orion) cardstock: American Crafts white textured alphas: Close to My Heart white alphabet foam stickers kraft tags: Jillibean Soup journal cards: Project Life (Jade Edition) enamel dots: The Paper Studio journaling pen: Spectrum Noir ArtLiner .005 other: craft foam, date stamp, crochet thread, ATG (adhesive)
I’ve been wanting to scrapbook these photos of my little boy from a few years ago, and when I got these CTMH papers and saw this sketch (from the Summer 2021 SCT call), I knew it was a perfect fit.
I followed the basic idea of the sketch, but I did make some changes. I used 3 photos: one 4″x6″ and two 4″x3,” which I arranged in a grid. The vertical piece is narrower on my layout, but my banner piece extends to the top edge.
I scraped some gold paste through a stencil to add some layers and texture behind the photo, and I’ve gotta say, I just love how it turned out.
I had a lot to say, so I ended up deciding to type my journaling and used the oft-used (but my first time trying, that I can remember…) “trick” to make an appropriately sized text box, print it on a scrap paper, then tape the journaling card on top and print again. My printer is not very precise, so I was definitely holding my breath as it came out– especially since this was my very last copy of this journaling card! It isn’t perfect, but I think you have to look very closely to see what I don’t like 😉 (nope, I’m not going to tell you!)
Adding the title probably took me the longest. First, I had to decide what alphas to use (and I’m so glad I decided to use these fabric Thickers in the end), and then, since they were larger than I’d originally planned, it took a lot of wiggling and squeezing and arranging to get them just so. It was of utmost importance to me that his cute little feet be highlighted and not at all covered by any part of the letters!
I used a combination of new stickers from the CTMH collection and old (some of them are quite old) stickers from my stash to embellish around the photo. For a final touch, I added some bright yellow enamel dots!
Supply list: patterned paper: Close to My Heart (Blue Skies) cardstock: American Crafts (white textured), stash (aqua) stickers: Close to My Heart (Blue Skies), Bella Blvd (Blueberry Little Bits), My Mind’s Eye (Lime Twist) alphas: American Crafts Thickers (Amy Tangerine “Hello”) journal card: Project Life (Jade edition) Thermoweb/Decofoil Metallix Gel (Champagne Mist) stencil: Paige Evans border punch: Fiskars (Threading Water) enamel dots: The Paper Studio journaling font: American Typewriter Regular
On our second Hollywood Studios day, my son ‘bounded as R2-D2. When we’d first started discussing clothing ideas for him, he actually came up with this idea, and I was delighted that I could make it happen for him!
I used the Blank Slate Patterns Bookworm Button-up pattern(affiliate link), and using photos of R2-D2, I planned out color blocking to evoke the character. The shirt is white (of course), with a grey yoke, horizontal blue accents on the pockets, a blue collar, and blue tabs on the sleeves. I like how the vertical blue tabs look like the blue accents on R2’s struts.
I used blue buttons down the front placket, white buttons on the sleeve tabs and one of the front pockets. Of course, we had one red button right on the front!
I think my son really enjoyed ‘bounding one of his very favorite Star Wars characters! And I love that he’ll be able to wear this shirt for dressier occasions and still subtly celebrate his fandom!
I was not just sewing for myself for this trip to WDW! My family gets involved in my Disney bounding ideas, and as we planned our wardrobe back in the spring, I had purchased a number of RTW garments for my daughter (the last time we went, back in 2016, I sewed princess dresses for her). It was harder to find things we liked for my son, so I decided to sew him a couple garments for this trip. On the first day, since we were going to Hollywood Studios, we all embraced our love of Star Wars.
this Magic Shot is so fun!
I was dressed in an R2D2 ‘bound, my daughter was ‘bounding Leia, and my son ‘bounded as Han Solo. We altered a pair of navy blue shorts he already had by adding strips of a red iron-on patch down the outer seamline. Over a plain white T-shirt, he wore a vest I sewed from black denim in my stash.
To make the vest, I used the (free) Melly Sews “Punk Vest” pattern with pockets that are from the Bookworm Button-up pattern(aff link). Since we knew it would be warm (and actually, this particular day had “feels-like” temperatures in the low 90s, so it really was hot and humid!), I chose to line the vest with some thin black cotton that was also in my stash.
This particular day was filled with amazing moments, and one of them was when my son got to interact (at a distance) with Chewbacca.
Periodically, Galaxy’s Edge/Star Wars characters come out onto a rooftop stage and wave to the crowd. My son and I had caught a glimpse of Chewbacca earlier but just missed him. A bit later, we were nearby and noticed that the characters were making another appearance. We were a little ways off, so we started moving forward. Chewie spotted him RIGHT away, even before we got fully into the open, and he pointed right at him and roared like he was seeing his old friend Han! It was SO SO awesome. Becker was waving and Chewie posed with his arms up in the air for photos behind Becker. It was about as perfect as you could get without being able to go up and hug them. Once again, major kudos to the Cast Members for really making these distanced interactions feel personal.
My 6-year old boy likes to “do crafts with Mommy” while my daughter and Husband are doing things together. While they went on her first long bike ride on a recent Saturday afternoon, my son asked to make a bug.
At first, he wanted to do a 3-D paper-crafted bug, but my searches on Pinterest were not yielding results that we liked. He’s done a lot of crafts with toilet paper tubes, and the more intricate 3-D paper insects that were more along the lines of his imagination were a bit beyond a 6-year-old’s capabilities (and Mommy’s patience after a long week of homeschooling! haha).
He wanted to make a smaller bug that looks like his stuffed Bug that I made him Christmas 2018, so that gave me the idea that perhaps we should find a stuffed fabric bug to make together. This time, the Pinterest search was more successful. After considering some options, we settled on a free little 3-D fleece/felt ladybug softie from Fleece Fun.
I couldn’t find anny blue and black fleece leftover from the original Bug, but I found plenty of small scraps of fleece from Husband’s squid that were just right for cutting out this cute little guy. (I am not a fleece fan, so I rarely sew with it, hence the dearth of scraps.)
In the end, my son was the official stuffer– I did all of the cutting and sewing, since we wanted to get it finished the same day. But he preferred to just watch the sewing steps, asking questions about what I was doing, rather than sit on my lap and help me guide the fabric.
The pattern is a good one, even if the instructions are sparse. The seam allowance is not specified, but 1/4″ worked well for me. It took us approximately 2 hours to choose the pattern, dig out the fleece scraps, cut everything, assemble, and stuff. I think it would be even quicker in the future if I ever make another!
The other day, our church’s fantastic children’s ministry director came over to help my kids make mosaic stepping stones. The stepping stones, once they are grouted, will join other children’s to border a new play area on our church’s grounds.
The kids each chose images that convey meanings of their names. I am so proud of them for coming up with such beautiful designs!
Here is my son’s…
Even though these stepping stones aren’t quite finished (the children’s ministry director will be grouting them and prepping them for placement on the church property), I wanted to post them so that we can enter them into the Simon Says Stamp Kids’ Summer Vacation Challenge for 2020!
My 6-year old son designed and constructed this birthday card for his good friend all by himself! I stamped several images for him with the Lawn Fawn “Rawrsome” set onto plain white cardstock (his friend loves dinosaurs!), and he colored and cut them out himself. He arranged them and adhered them to the card front before writing his message inside.
He has lately loved sunsets, so notice that there is a sunset in the sky, as well as a pterodactyl silhouetted against the setting sun!
All content on this site is (C) 2007 - present, all rights reserved, by the author. Content from this site may not be republished or distributed without my permission. Thank you for respecting my copyright!