So, I’ve been wanting to make a backpack for my daughter for a while now. Twice each week, we go to Bible study, and she was over-the-moon excited when I got out an old, old, old Jansport backpack of mine (middle school? High school?) for her to carry her things (“It’s like I’m going to school, Mommy!!”). The problem is that it is so old that the seam allowances started to shred and were was catching in the zipper.
I told myself that I would work on it once the quilt was finished. But just as I finished the quilt top, I realized we had a plane trip coming up, and I wanted her to have a good bag for it.
I thought about going an easier route and making a messenger bag, but the more I thought about it, the more I really wanted to do an actual backpack. With a front pocket. Zippers. The whole shebang.
Pinterest to the rescue: I found some fantastic tutorials! I first found THIS cute one at “Crazy Little Projects,” which really helped me to visualize the steps for its construction. I loved that it was a lined bag, and I used her method for inserting the main zipper. Reading the comments led me to another post, which linked to another series of posts starting HERE, at the Uniquety blog. These posts added more details, including a front pocket, which I think makes the backpack look even more “store-bought.” Bingo!
It took some time for me to work out my pattern and fit all the pieces on my fabric. All along, I’d intended to use an old pair of Husband’s jeans for the outer fabric, and it took almost every scrap of them to piece together the outer bag. I also had a pair of shorts of mine that had a broken closure–is saved them because the pockets were just so cute. I cut them up to make the front pocket (from the back pocket of the shorts) and add pockets to the gusset (smaller pockets from the front of the shorts).


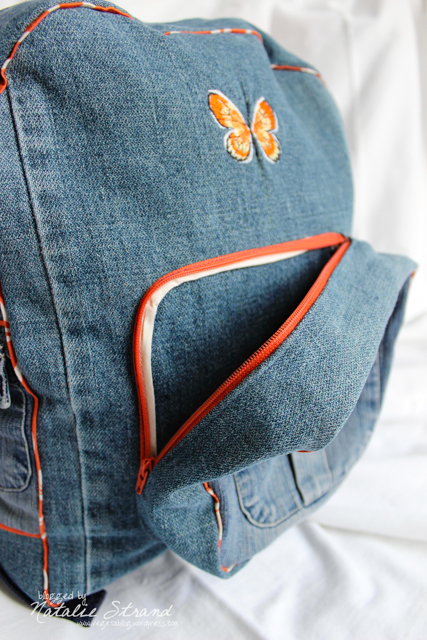


Of course, I had to embellish even further. I broke out the embroidery attachment to my sewing machine to add a butterfly to the outside of the bag. The denim pocket inside (sized to hold V’s Leap Pad) is embroidered with her name. Just above the denim pocket is a zipper pocket to hold small items (like the game cartridges for the Leap Pad) safely.

The lining of the bag is also repurposed fabric! A number of years ago, I wrote a blog post about the buttonholer for my sewing machine for the Sew Mama Sew! blog. They kindly sent me a yard of this beautiful cotton. After a while, I got brave and cut into it to make a pajama top, but it was an unfortunate choice: the shape was totally unflattering. I couldn’t bring myself to toss it, so I saved it… It was the perfect amount of fabric to line this bag and the pockets, and I used 3/4″ strips to make a fake piping to edge the outer bag.


Oh yeah, and I made a mistake when I put the outer gusset together, so I came up short by a few inches. I inserted a quilted section of the orange fabric, which turned out even cuter in the end!

I had all of the materials on hand except the zippers, webbing, and strap buckles. I also purchased some threads for my machine embroidery. I spent less than $12 for new supplies.
I am so incredibly proud of this backpack. It was one of those projects that took over my brain and made me breathless with excitement as I developed the plan.


Eeeee it’s so awesome!! I am thoroughly impressed. I bet V loves it. Isn’t so gratifying to use materials that you’ve saved for so long to make something that’s just right?!! You are helping to vindicate all craft supply hoarders… Which is probably equivalent to saying “you are vindicating all crafter’s,” now that I think about it 🙂
Awesome!! 🙂 Love it.
[…] this card! I haven’t done much with my paper supplies recently (what with the quilt and the backpack…), but when a scrapbook-y friend of mine had a birthday coming up, I knew I wanted to try and […]
[…] is made from cotton, which I quilted to fabric from an old mattress pad in the same way as my daughter’s backpack‘s […]